AWS IAM Identity Center - SAML My Page SSO Configuration - RSA Ready Implementation Guide
Configure RSA Cloud Authentication Service
Perform these steps to configure RSA Cloud Authentication Service using My Page SSO.Procedure
- Sign in to the RSA Cloud Administration Console with administrator credentials.
- Enable SSO on the My Page portal by accessing the RSA Cloud Administration Console > Access > My Page > Single Sign-On (SSO). Ensure it is enabled and protected by two-factor authentication using a Password and Access Policy.
- On the Applications > Application Catalog page, click on Create From Template.
- On the Choose Connector Template page, click Select for SAML Direct.
- On the Basic Information page, enter a name for the configuration in the Name field and click Next Step.
- In the Connection Profile section, select IdP-initiated option.
- To provide Service Provider details, select Import Metadata, click the Choose File button, and select the file downloaded from the Service Provider.
Refer to the AWS IAM Identity Center configuration steps to get metadata file. - Assertion Consumer Service (ACS) URL and Service Provider Entity ID values will be auto filled.
- In the SAML Response Protection section, select IdP signs assertion within response, and download the certificate by clicking Download Certificate.
- Under the User Identity section, select Show Advanced Configuration, then configure Identifier Type and Property as follows:
- Identifier Type: Auto Detect
- Property: Auto Detect
- Under the Statement Attributes section, add the following attributes:
- First Attribute:
- Attribute Name: https://aws.amazon.com/SAML/Attributes/RoleSessionName.
- Attribute Source: Identity Source.
- Property: mail.
- Second Attribute:
- Attribute Name: https://aws.amazon.com/SAML/Attributes/Role.
- Attribute Source: Constant.
- Property: AWS role ARN value, AWS IAM instance session ARN value.
- First Attribute:
For example: Combine the Role ARN and the Provider ARN value, separated by a comma, to use as the Property value.
arn:aws:sso:::instance/ssoins-7223fbc530cf9d85,arn:aws:iam::664847341240:role/RSA_Role1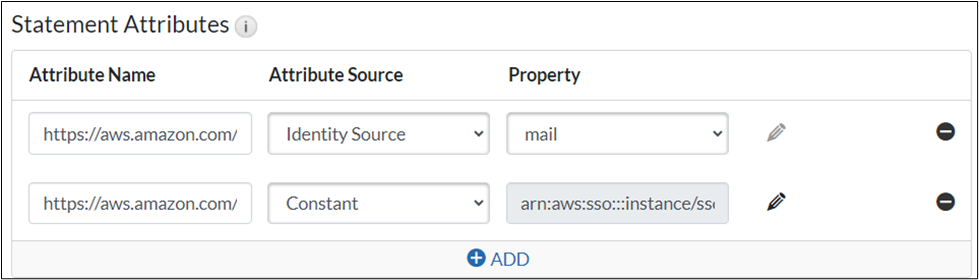
arn:aws:sso:::instance/ssoins-7223fbc530cf9d85,arn:aws:iam::664847341240:role/RSA_Role1
Refer to the AWS IAM Identity Center Configuration section to obtain AWS role ARN value and AWS IAM instance session ARN value.
- Click Next Step.
- Choose your desired Access Policy for this application and click Next Step > Save and Finish.
- On the My Applications page, click the Edit dropdown and select Export Metadata to download the metadata.
- Click Publish Changes to save your settings. After publishing, your application will be enabled for SSO.
Configure AWS IAM Identity Center
Perform these steps to configure AWS IAM Identity Center.Procedure
- Access the AWS Mangement Console by logging in to your AWS account with admin credentials.
- Under Services, go to Security, Identity, & Compliance, and select IAM Identity Center.
- Click Go to Settings on the right.
- Under Identity Source tab, select Change identity source from the Actions dropdown menu.
- Select External identity provider, then click Next.
- Configure the external identity provider and click Next:
- Service provider metadata: Click Download metadata file to download the SP metadata.
- IdP SAML metadata: Click Choose file and upload the metadata downloaded from the RSA platform.
- Review the list of changes. Once you ready to proceed, type ACCEPT and click Change identity source.
- Go to Settings and copy the Instance ARN for the RSA configuration (Attribute mapping).
- To create groups, navigate to AWS IAM.
- Select User groups, then choose Create group.
- Provide the following details, then scroll down and click Create group.
- Name the group - In the User group name text box, enter the name of the group.
- Name the group - In the User group name text box, enter the name of the group.
- To create a user, go to Access management > User, then click Create user.
- Under User details, enter the user name in the User name text box, then click Next.
- To create roles, go to Access Management > Roles, then click Create role.
- Select the Trusted entity type as SAML 2.0 federation.
- Provide the following details and click Next.
- SAML 2.0-based provider: Name for the SAML 2.0 trusted provider.
- Attribute: SAML:aud.
- Value: Assertion URL of the service provider metadata downloaded from the IAM Identity Center.
- Copy the ARN. This is the same value as AWS role ARN value used in the RSA configuration (Attribute mapping).
- Combine the Role ARN and the Provider ARN value, separated by a comma, to use as the Property value in the RSA platform.
Return to AWS IAM Identity Center- RSA Ready Implementation Guide .


